
Getting Back in Action with Some Shop Expansion
A new table saw sets off a slew of shop upgrades

First, let me begin with my standard, but still heartfelt, apology for the lengthy absence since my last post. And while I’m at it, let me go ahead and get the next apology out of the way, too, since it will likely be at least a few weeks before my next one.
Sorry. And sorry.
I don’t know how people like Joe Posnanski, the terrific, prolific, and Cleveland-cursed sportswriter, manages to pump out a thousand (or more) words a day, plus all else he does. I guess it’s a combination of discipline and maybe a lack of other hobbies? What with actual work, woodwork, gardens, goats, bees, chickens, dog, cats, family, etc., I find the blog is one of the first casualties from the daily to-do list.
But not today! So let’s get started.
A Two Table Saw Family
When I was a kid, if I saw a family had an extra refrigerator or freezer in its garage, I felt like I was gaining a glimpse into the lifestyles of the rich and famous. These days, that’s not so uncommon. But a shop with two table saws? That’s the stuff of TV DIY fantasy.
So when a friend suggested that his urban-dwelling SawStop no longer fit his Capitol Hill lifestyle, and did I want it for a bargain?, visions of sawdust fairies flitted in my imagination. Why of course, I said.
Why two table saws? Aside from the obvious answer (why not two table saws??), there are a few reasons. First, the SawStop is a more powerful saw, so it would be able to more easily (and safely) cut thicker, harder woods. Second, the SawStop is a profoundly safer saw, with flesh-detection technology that stops the blade if it comes into contact with meat, like hot dogs or fingers.
Ok, so those are actually good reasons for replacing my existing saw, not adding a new one. By adding a saw, I could essentially dedicate each saw to a different purpose. For example, ripping on the SawStop while cutting dadoes on the Laguna, thus negating the need to change blades so often.
Also, I’m an adult man and I don’t need to justify my tools to you! I only need to justify them to my wife.
Anyway, after my friend and I moved the SawStop into the shop, I shifted my existing Laguna table saw and benches around so that the rears of the saws faced each other, separated by a large table. Because the table stood two inches taller than the saws, I slipped boards under each tool to get everything roughly even.
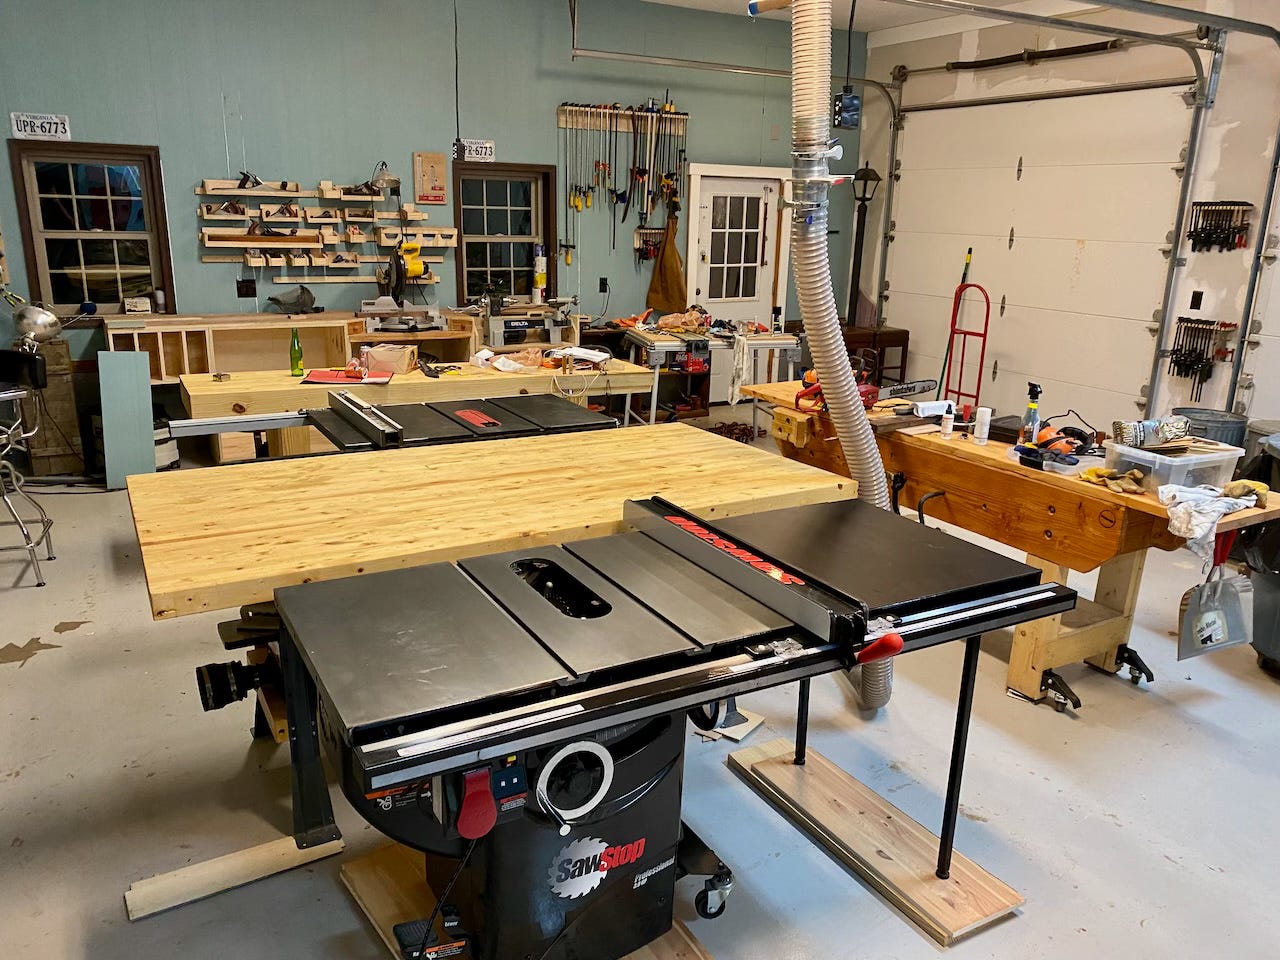
In theory, that would allow for the table and opposite saw to serve as outfeed tables. In practice, though, the three surfaces weren’t exactly co-planar and the table lacked grooves to match the saws’ T-tracks, meaning a miter gauge running through a slot would bump up against the middle table. That’s kind of like parking too close to another car and being unable to open your door.
After a few weeks like that, I decided to build a custom tabletop to precisely fit between the saws. To make this work, I needed to get each saw to be at the exact same height. Then, I’d need to precisely cut a large flat surface to butt up against (and in the case of the Laguna, wrap around) each saw. I’d then need to find a way to secure the piece to each saw to create one continuous surface. And finally, I’d need to cut T-track grooves in the middle surface to align with the tracks in each saw.
No matter how easy or hard you think it would be to do that, let me assure you: it was much, much harder.
I started by pushing the table out of the way and removing the lifts I had under each saw. After adjusting the saws to the same height, I made my measurements and cut a piece of ¾-inch medium-density fiberboard (MDF) to fit. The SawStop sports a metal ledge on the rear of the saw with holes in it. I set the MDF on this ledge and noted that it was about an inch below the top of the saw. So I added some spacing blocks to get it coplanar. Screws through the ledge into the MDF would hold that in place.
The Laguna also had a similar ledge, but it lacked holes. It also was less than ¾ of an inch below the saw’s surface. That meant that if I just rested the MDF on the ledge, it would be too high. To fix this, I flipped the MDF over and cut a groove along that edge so that the MDF would drop to the correct level.


The Laguna also had a smaller top than the SawStop, so I decided I’d wrap the MDF around the Laguna, creating a dogleg in that top. A benefit of this approach is that the dogleg could be aligned with the Laguna’s extended front rail, which had a slotted track on the inner edge. In theory, that’d allow me to anchor the dogleg into the rail, locking the two table saws and the top together. However, the rail’s track was lower than the bottom of the MDF. So to make this work, I faceglued another piece of MDF to the underside of the dogleg, doubling its thickness. I then drilled two holes into the MDF into which I screwed threaded inserts. And into those threaded inserts, I screwed T-bolts so that the Ts would lock into the rail’s track and support the MDF.
I made some other adjustments to get everything to fit together, including dropping the MDF a quarter inch below the saws’ surfaces, so that I could attach ¼-inch hardboard to the top, giving the center piece a harder, smoother, tougher glide surface. I screwed the pieces together, countersinking the screws so they’d be below the surface. I then used a router to cut the T-track slots in the center piece, added some additional support bracing, and smoothed out some rough edges.


The results were excellent, though the center table wasn’t perfectly coplanar with the saws; In some spots, it was slightly above the saws. To fix that, I hand-planed and sanded the joints so that there were gentle hills for the material to easily climb over as I passed them through the saws.
More Tables, Dust Collection and Tool Storage
With the set up in good shape and my mood soaring, I rearranged some of the shop furniture and found a table that could further extend one side of the dual table saw arrangement. I added MDF and hardboard to bring it coplanar to the saws. Then I re-worked the dust collection to serve both saws, including an over-the-blade shroud for the SawStop.
The arrangement had the added bonus of creating space under the saws for small storage units. Using some extra plywood, I built two three-drawer units on rollers to hold various saw accessories — miter gauges, riving knives, push blocks, tourniquets, etc.
And while I was at it, I also finally added doors to a base cabinet I had built as well as drawers to my miter saw/lathe station, giving me handy storage for all manners of chop saw and lathe tools and accessories. (If I ever tie that station into the main dust collection system, I might add shelves and doors or drawers to the center cabinet where the vacuum currently resides.)


Then I gave everything a nice coat of Christopher Schwarz’s special finish concoction: 1 part boiled linseed oil, 1 part spar urethane, and 1 part paint thinner.
Now my shop is fully complete and there’s absolutely nothing else I want or need. Except maybe dust collection expansion. And an updated drill press. And a cabinet planer. And a cabinet jointer. A sliding compound miter saw upgrade would be nice, too. But that’s it. Oh, and…
You're brilliant! Love, Dad