Mudroom 4: It's a Wrap
We add the moulding, the doors and the seat

When last we checked in on the mudroom, we had installed the cabinets and started adding trim. You could see it coming together and we were pretty pleased with its progress, but it was still very much that: a work in progress.
To bring the project to the finish line, we needed to add the moulding, hang the doors, add the bench seat, and finalize the trim.
We were able to re-use the base moulding we had pulled off the wall at the beginning of the project, which my friend had stored it in his basement. We brought it up, made our measurements, cut it, and nailed in place. Easy peasy.
For the crown moulding, my friend found a close match to what he had in the rest of the house. We cut the outside corners following the brilliant guidance from Wood Magazine’s Jim Heavey:
It was the same guidance I used when I installed crown moulding in my house and even though this project had just one set of outside corners, it still is super helpful to get things right.
That said, we still ran into some challenges. The crown moulding we were using sat against the wall at a 45-degree angle, instead of the more typical 52/38. In addition, the outside corner wasn’t really 45 degrees. It was more like 43, so we had to make numerous sample cuts until we got it to fit just right.
It All Hinges on the Doors
Before we turned to the doors, we added more shelf pin holes to give more shelving flexibility. Using my shelf pin jig, we added about a dozen holes up the cases. All hail jigs!

Then we opened the box of European concealed hinges my friend had ordered (following my instructions) only to discover they were the wrong kind (my fault). We ran to Home Depot, found the long-arm, overlay, soft-close variety we needed, and bought a dozen of them. (My friend was able to return the wrong ones.)
European, or hidden, hinges are designed to sit in a recess on the inside of the door and are then attached to the cabinet. Because the hinges are unseen when the doors are closed, they are called “concealed” hinges. Because they are expensive, they are called “European” hinges.*
*Not true. They are called European hinges because they drive manual cars, smoke unfiltered cigarettes, and watch movies that lack an explicable narrative arc.**
**Christopher Nolan films exempted.
To install these hinges, one must drill a flat recess in the cabinet doors for each hinge. Thus, it was critical I get the placement of the recesses exactly right or else I’d royally screw ups the doors. For this, I used a jig from Kreg that makes it easy to get every recess cut just right. Still, I wanted to practice to make sure I didn’t make any mistakes. So, I grabbed a piece of scrap wood and used it to make a sample cut. Once I was confident I had everything figured out, I turned to the doors, measured for location for the hinges, and got cutting.


Once the hinges were installed on the doors, my friend helped me hold them in place as we screwed the hinges to the frames.
Benched
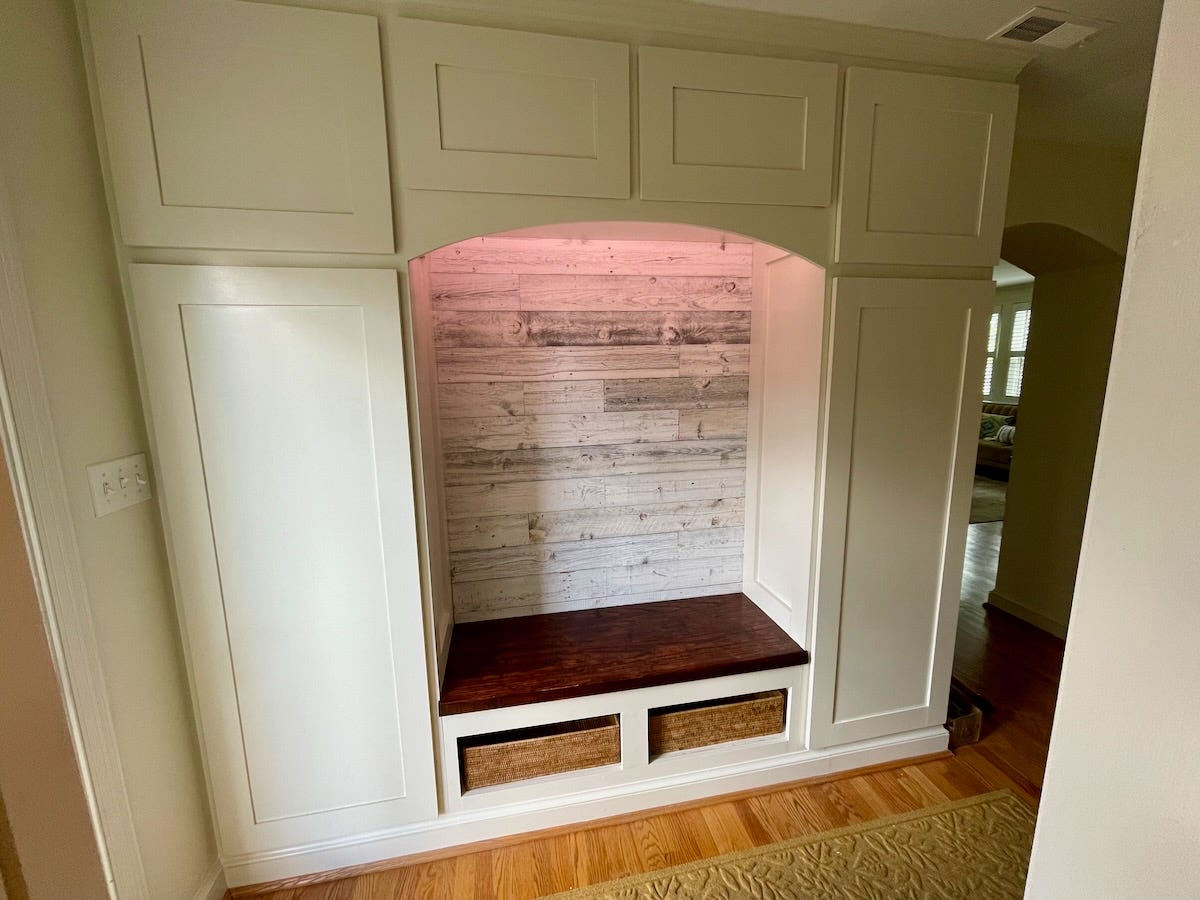
With the moulding on and the doors hung, we turned our attention to the bench seat. My friend wanted the seat to match distressed oak countertops and doors he had elsewhere in his house. To do that, I decided to make the bench top in my shop. We made a cardboard template of the seat space for me to use for sizing.


I bought a beautiful piece of red oak at my lumberyard — two inches thick, about eight inches across and about eight feet long. I’d need to cut the piece in half and edge-glue it in order to get a seat that was the necessary 15 inches or so deep. Because the piece was rough sawn, I needed to create a clean, jointed edge for the glue-up.
This presented me with a challenge — how was I going to surface the wood while still keeping it distressed as desired? And how distressed should it be, anyway?
I decided to clean up most of the oak, leaving one edge and one face barely touched — original sawmill marks remained visible. I cut the plank in half and then used my hand plane to joint the two edges that would be glued together.


Although it’s not reflected in the template, we also decided we wanted the bench top wrap around the face frame. So, once the glue was dry, I used the template to mark out the exact size of the top. I cut off the edges as indicated (using a little Tommy Silva trick of cutting the ends on a bevel to ease installation) and cut out the notches for the front of the bench to wrap around the face frame.
Then it was time to beat the shit out of this thing. I grabbed some chains, laid them on the bench top and whacked them with my hammer. I drilled tiny holes to mimic wood worms. I struck the top with an axe to mimic more sawmill marks. I set a handplane to have a deep and angled knife and ran it across the top. I used my belt sander to create gouge marks.
Was it enough? Too much? I didn’t know. I lightly sanded to remove the sharp edges and then wiped it down with acetone to get a better sense of how it would look when finished. It seemed like it might just do.
For the finish, I had tested several colors of General Finishes oil-based gel stain on scrap red oak and compared them to what my friend already had in his house. Once we decided on the color, I pre-conditioned the oak and then applied the stain. It goes on thick, but the color is deep and beautiful. The distressed marks absorbed extra stain and turned dark. The rest of the wood glowed. I applied two coats and then applied two coats of General Finish’s satin top-coat. It looked pretty, pretty good.


Finally, it was time to bring the bench back to my friend’s place. We planned to use construction adhesive to hold it in place, but as we tapped it down, the snug fit kept it tight, rendering adhesive unnecessary. The notches fit snugly, if not absolutely perfectly. Distressed hand of the artist, right?
We then added the final pieces of trim over the seat and up the inside of the seating area.
Then we stood back to admire: It came out pretty much exactly as my friend designed. My friend still needed put a finish coat of paint on the unit and add door knobs, but aside from that, we were done.