
A Pair of Desks
As usual, the second attempt turns out better

A friend recently told me my posts remind her of the joke about the old ladies in the Catskills complaining about the food: tastes terrible and the portions are too small. Only in my case, apparently my posts are too long and too infrequent (and probably also not very good).
Ok, so let’s keep this one short. Last fall, a friend — my other friend — asked if I would build her a writing desk. Let me say here and now that I love being asked to build things for people. It may be my favorite thing.
I was delighted, of course, though I warned her it might take me a bit of time due to other projects. True to my word, it took about six months and I annoyed her to no end with questions and options. Ultimately, we decided on a simple writing desk made out of maple and stained a rich, deep brown. Ideally, she said, it’d have a couple of drawers.
Even though I had a good idea of what I was going to build, I still wanted to get ideas from catalogs, websites, and woodworking magazines. Ultimately, I found an article in Fine Woodworking magazine that was pretty close to what I had in mind, so I used it as a guide.
I picked up some beautiful maple at my local hardwood supplier and got busy planing, jointing, and all the rest. Three seven-inch-wide boards came together to form the top. I laminated two-inch-thick boards to create the desk’s legs.
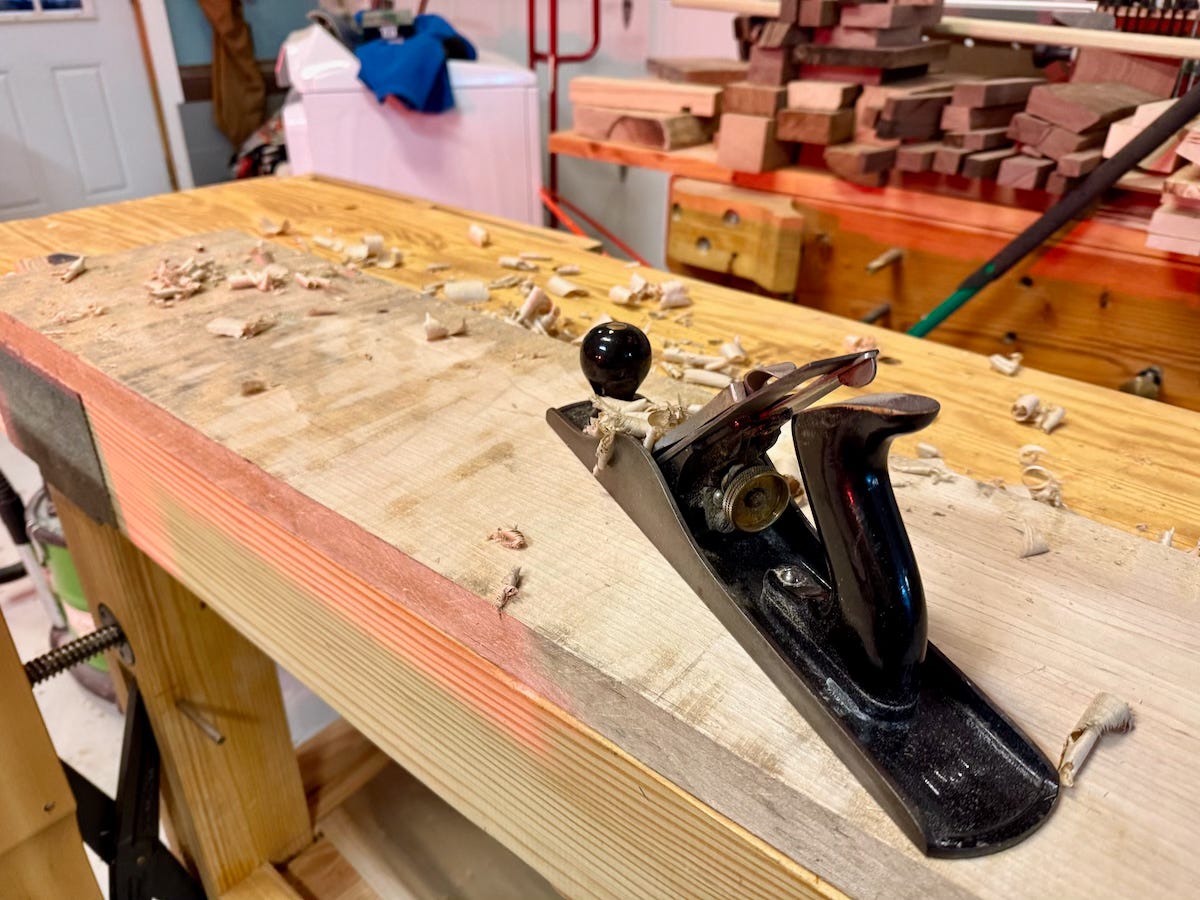
Using the drill press and hand tools, I carved out mortises in the legs before tapering them on the table saw. The desk’s aprons — the parts the run under the top and connect the legs — would have tenons that fit into the mortises. Then I’d drive dowels through the mortises and tenons to lock everything together.
All of that is simple enough and work I’ve done before. Adding drawers, through, added complexity. The idea was that the drawers would be “hidden.” To the casual observer, you’d see the wood’s grain run uninterrupted across the front apron, not realizing two drawers make up most of that front face. To make this work, I needed to build a frame to sit behind the front apron to keep the front tied together. And to support the drawers, I needed to build guides that would run from this front frame to the back apron. Of course I also had to build the drawers themselves, which I made with interlocking finger joints.


It is at this point that I must point out that in woodworking, like in math, order of operations matters. A lot. And it is at this point that I must point out my supernatural ability to screw that up. In this case, the supports that are to run front to back should have been nestled into the rear apron in order to give the drawers maximum support. For that to happen, I should have made cuts in that rear apron before I glued it into the legs.
Alas.
Suffice it to say — hey, I’m trying to keep this short for you, AE — I had to come up with a workaround that was kludgy and embarrassing. Furthermore, I had made other missteps. Some of my mortises were too big for the tenons, though I managed to “fix” and hide that problem with wood wedges. The draw bore holes I made to lock the mortises and tenons in place were too misaligned in a foolish attempt to help keep things super tight, which resulted in some tenons splitting. I failed to properly adjust the length of the rear apron to account for the slightly shorter front apron (by about ¾ inch) due to the three cuts that create the drawer fronts leaving unsightly gaps between the drawers.
In other words, I had made numerous mistakes and my displeasure with the desk was growing.
Nevertheless, like Elizabeth Warren, I persisted. I sanded everything smooth. Knowing maple’s propensity to “blotch” when stained, I applied a pre-stain treatment designed to prevent said “blotching.” Then I applied the stain. It blotched anyway.
The stain looked terrible. It revealed all kinds of scratches and sanding marks that I thought I had scrubbed away. Did I mention that it blotched terribly? It did. Furthermore, the continuous grain I was seeking for the front apron and across the drawers was impossible to see.
I was annoyed and dismayed, but I also took it as a sign. This desk was not working out. I needed to start over.
I had kept my friend apprised of the progress and that the desk was nearly finished, so I was a bit sheepish to break the news that I was going to have to start over. She assured me it would have been fine as is, but I wasn’t willing to sell her this desk. It just wasn’t up to par. I was embarrassed.
After a few weeks, I began desk number two.
But before I made any cuts — or even purchased any wood — I decided to build a mortising jig. I used another set of plans from Fine Woodworking with the idea that such a jig would allow me to make higher quality, better fitting mortises than what I did on the first desk — and more quickly and safely to boot.


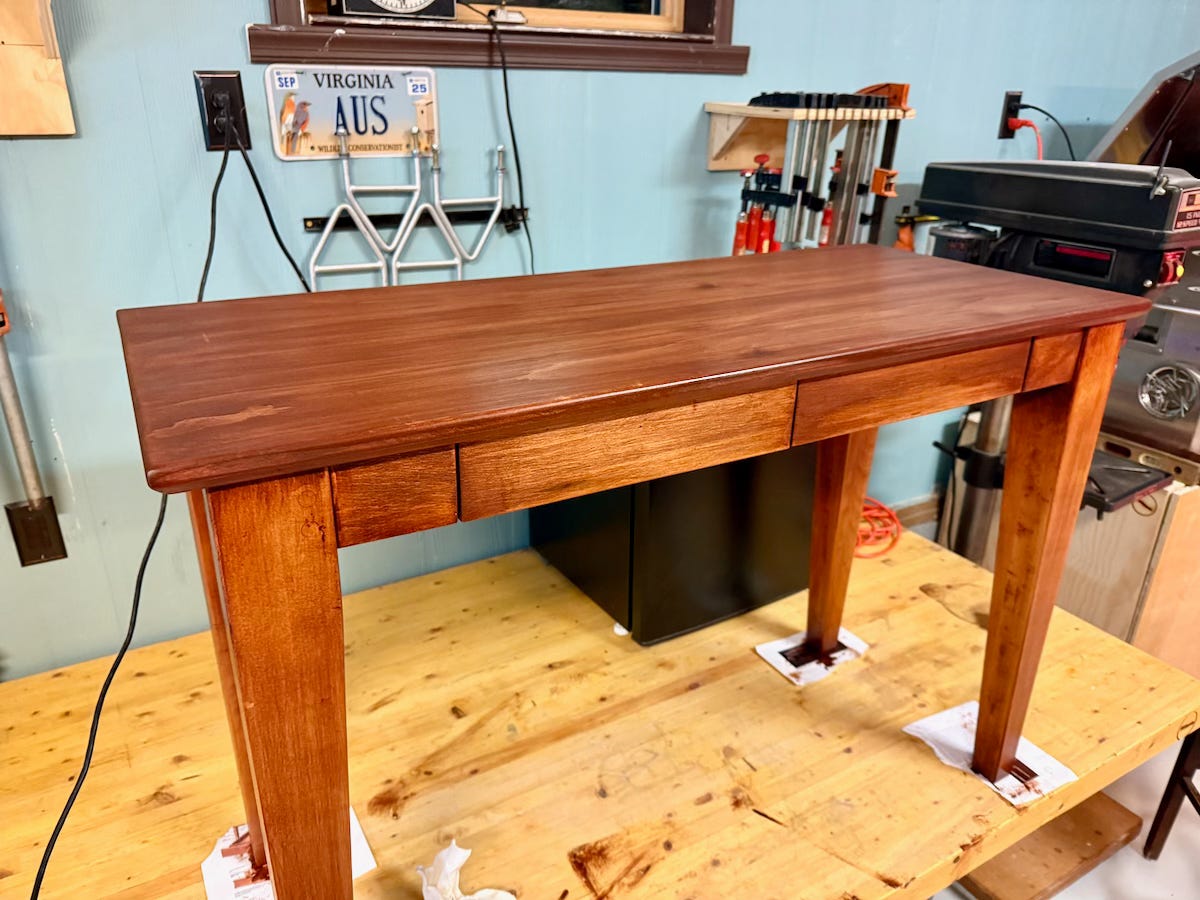
Once I had the jig built, I bought red oak for this new desk. Oak takes stain beautifully and would definitely allow the grain across the front apron to pop.
Then I repeated my process being sure to avoid the prior mistakes. The mortising jig worked great. The drawers fit more tightly. The drawer runners were properly supported in the frame and apron. Before too long, I had the desk and built and it looked beautiful. I sanded and sanded and sanded some more. Then I applied the stain. And this time, I was not disappointed. After several coats of stain, more standing, and some protective top coats, the desk was finally finished. This time I was happy. Or at least as happy as I get.


Really nice job. I feel your pain. I’ve never had luck staining maple. It just doesn’t like it. Thanks for sharing your experience.
I picture an inkwell in the top right corner, with a long quill leaning from it.